বুধবার, ৯ নভেম্বর, ২০১১

Virus in Windows System Registry

Virus in Windows System Registry

It's hard to remove the virus in the Windows System Registry, because it's not easy to find where the virus hides. Also, it's danger to edit the data inside the registry. If you enter or delete wrong key, data or value, Windows might be unable to run after that. Here we just show you how to check any unwanted program loaded into the memory when Windows start.

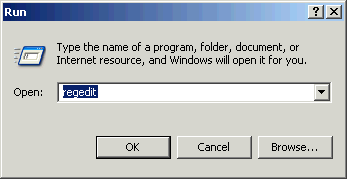
To change the registry data needs to run Microsoft Registry Editor - RegEdit.exe. You can click the Start Button, then select Run... item. When the Run Window will appear, then type 'RegEdit' into Open: textbox and click OK button.

You might be unable to RegEdit, because the virus blocks the doorway. In this case, you need to bring up your Windows in Safe Mode to run the RegEdit. Sometimes, you need to login the Administrator account. Therefore, make sure you know your Administrator account's password when you own the new computer.

Microsoft System Configuration Utility MSConfig.exe keeps entries of Start-Up programs. Besides that, System Registry has Run, RunOnce and RunOnceEx entry nodes to manage which program can run while Windows is starting.

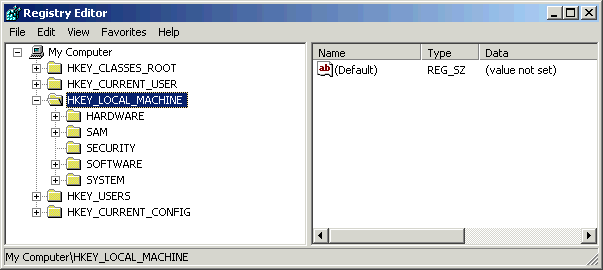
First, you should check any starting programs inside the HEKY_LOCAL_MACHINE.

Go down to the node in HEKY_LOCAL_MACHINE\SOFTWARE\Microsoft\Windows\CurrentVersion, then look for program entry inside the Run, RunOnce and RunOnceEX. If you find something you don't know, then you type the program name .exe name into the following Search box to find out what's that. If the .exe name is the virus or spyware, then you can delete it.

Google

It's same that you need to check any starting program inside the HEKY_CURRENT_USER.

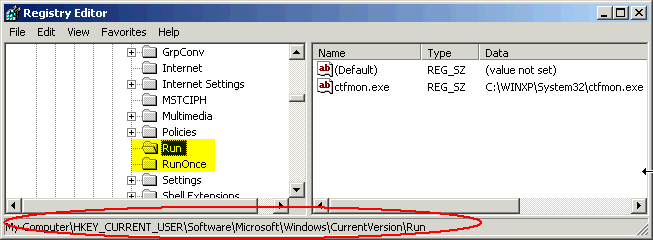
Go down to the node in HEKY_CURRENT_USER\SOFTWARE\Microsoft\Windows\CurrentVersion, then look for unwanted .exe programs inside the Run, RunOnce and RunOnceEX. If you find something, then delete them.

Some virus will restore the entry later or reboot, even you delete the entry from System Registry Editor. Those virus needs special tools to kill them.

Schedule Disk Cleanup to run automatically

Windows 7

  1. Open Task Scheduler: Click the Start button, click Control Panel, click Administrative Tools, and then double-click Task Scheduler. If you're prompted for an administrator password or confirmation, type the password or provide confirmation.

  2. Click the Action menu, and then click Create Basic Task. This opens the Create Basic Task Wizard.

  3. Type a name for the task and an optional description, and then click Next.

  4. To select a schedule based on the calendar, click Daily, Weekly, Monthly, or One time, and then click Next.

  5. Specify the schedule you want to use, and then click Next.

  6. Click Start a program, and then click Next.

  7. Click Browse, and, in the File name box, type cleanmgr.exe, click Open, and then click Next.

  8. Click Finish.

Windows Vista

  1. Open Task Scheduler: Click the Start button, click Administrative Tools, and then click Task Scheduler. If you are prompted for an administrator password or confirmation, type the password or provide confirmation.

  2. Click the Action menu, and then click Create Basic Task.

  3. Type a name for the task and an optional description, and then click Next.

  4. To select a schedule based on the calendar, click Daily, Weekly, Monthly, or One time, and then click Next.

  5. Specify the schedule you want to use, and then click Next.

  6. Click Start a program, and then click Next.

  7. Click Browse, and, in the File name box, type cleanmgr.exe, click Open, and then click Next.

  8. Click Finish.

Windows XP

  1. Click Start, and then click Control Panel.

  2. Click Performance and Maintenance.

  3. Under or pick a Control Panel icon, click Scheduled Tasks.

  4. In the Scheduled Tasks window, double-click Add Scheduled Task.

  5. In the Scheduled Task Wizard, click Next.

  6. Scroll down to Disk Cleanup in the list of Applications, click it (to highlight it), and then click Next.

  7. Under Perform this task, click Weekly, and then click Next.

  8. Set the time and day of the week you would like to run Disk Cleanup. For best results, choose a time when you're typically at your computer so you can provide any required input. Click Next.

  9. Type your password in both the Enter the password and Confirm password boxes, and then click Next.

  10. Click Finish.

How to make a computer faster: 6 ways to speed up your PC

How to make a computer faster: 6 ways to speed up your PC

By following a few simple guidelines, you can maintain your computer, help increase your PC speed, and help keep it running smoothly. This article discusses how to use the tools available in Windows 7, Windows Vista, and Windows XP Service Pack 3 to help make your computer faster, maintain your computer efficiently, and help safeguard your privacy when you're online.

Note: Some of the tools mentioned in this article require you to be logged on as an administrator. If you aren't logged on as an administrator, you can only change settings that apply to your user account.

1. Remove spyware, and help protect your computer from viruses

Spyware collects personal information without letting you know and without asking for permission. From the websites you visit to user names and passwords, spyware can put you and your confidential information at risk. In addition to privacy concerns, spyware can hamper your computer's performance. To combat spyware, you might want to consider using the PC safety scan from Windows Live OneCare. This scan is a free service that helps check for and remove viruses.

Download Microsoft Security Essentials for free to help guard your system in the future from viruses, spyware, adware, and other malicious software (also known as malware). Microsoft Security Essentials acts as a spyware removal tool and includes automatic updates to help keep your system protected from emerging threats.

The Microsoft Windows Malicious Software Removal Tool is another utility that checks computers running Windows 7, Windows Vista, Windows XP, Windows 2000, and Windows Server 2003 for infections by specific, prevalent malicious software, including Blaster, Sasser, and Mydoom, and helps remove any infection found.


2. Free up disk space

The Disk Cleanup tool helps you to free up space on your hard disk to improve the performance of your computer. The tool identifies files that you can safely delete and then enables you to choose whether you want to delete some or all of the identified files.

Use Disk Cleanup to:

  • Remove temporary Internet files.
  • Delete downloaded program files, such as Microsoft ActiveX controls and Java applets.
  • Empty the Recycle Bin.
  • Remove Windows temporary files, such as error reports.
  • Delete optional Windows components that you don't use.
  • Delete installed programs that you no longer use.
  • Remove unused restore points and shadow copies from System Restore.

Tip: Typically, temporary Internet files take the most amount of space because the browser caches each page you visit for faster access later.

To use Disk Cleanup:

Windows 7 users

  1. Click Start, click All Programs, click Accessories, click System Tools, and then click Disk Cleanup. If several drives are available, you might be prompted to specify which drive you want to clean.
  2. When Disk Cleanup has calculated how much space you can free up, in the Disk Cleanup for dialog box, scroll through the content of the Files to delete list.

    Disk Cleanup dialog box
  3. Clear the check boxes for files that you don't want to delete, and then click OK.
    • For more options, such as cleaning up System Restore and Shadow copy files, under Description, click Clean up system files, and then click the More Options tab.
  4. When prompted to confirm that you want to delete the specified files, click Yes.

After a few minutes, the process completes and the Disk Cleanup dialog box closes, leaving your computer cleaner, performing better, and potentially increasing your PC speed.

Windows Vista users

  1. In the Start menu, click All Programs, click Accessories, click System Tools, and then click Disk Cleanup.
  2. In the Disk Cleanup Options dialog box, choose whether you want to clean up your own files only or all of the files on the computer.
  3. If the Disk Cleanup: Drive Selection dialog box appears, select the hard disk drive that you want to clean up, and then click OK.
  4. Click the Disk Cleanup tab, and then select the check boxes for the files you want to delete.
  5. When you finish selecting the files you want to delete, click OK, and then, to confirm the operation, click Delete files. Disk Cleanup then removes all unnecessary files from your computer. This may take a few minutes.

The More Options tab is available when you choose to clean files from all users on the computer.

Windows XP users

  1. Click Start, point to All Programs, point to Accessories, point to System Tools, and then click Disk Cleanup. If several drives are available, you might be prompted to specify which drive you want to clean.

    Disk Cleanup dialog box
  2. In the Disk Cleanup for dialog box, scroll through the content of the Files to delete list.

    Disk Cleanup dialog box
  3. Clear the check boxes for files that you don't want to delete, and then click OK.
  4. When prompted to confirm that you want to delete the specified files, click Yes.

After a few minutes, the process completes and the Disk Cleanup dialog box closes, leaving your computer cleaner and potentially performing better.


3. Speed up access to data

Disk fragmentation slows the overall performance of your system. When files are fragmented, the computer must search the hard disk as a file is opened (to piece it back together). The response time can be significantly longer.

Disk Defragmenter (sometimes shortened to Defrag by users) is a Windows utility that consolidates fragmented files and folders on your computer's hard disk so that each occupies a single space on the disk. With your files stored neatly end to end, without fragmentation, reading and writing to the disk speeds up.

When to run Disk Defragmenter

In addition to running Disk Defragmenter at regular intervals (weekly is optimal), there are other times you should run it, too, such as when:

  • You add a large number of files.
  • Your free disk space totals 15 percent or less.
  • You install new programs or a new version of the Windows operating system.

To use Disk Defragmenter:

Windows 7 users

  1. Click Start, click All Programs, click Accessories, click System Tools, and then click Disk Defragmenter.

    Disk Defragmenter dialog box, with the Configure schedule button selected
  2. In the Disk Defragmenter dialog box, click the drives that you want to defragment, and then click the Analyze disk button. After the disk is analyzed, a dialog box appears, letting you know whether you should defragment the analyzed drives.

    Tip: You should analyze a volume before defragmenting it to get an estimate of how long the defragmentation process will take.
  3. To defragment the selected drive or drives, click the Defragment disk button. In the Current status area, under the Progress column, you can monitor the process as it happens. After the defragmentation is complete, Disk Defragmenter displays the results.
  4. To display detailed information about the defragmented disk or partition, click View Report.
  5. To close the View Report dialog box, click Close.
  6. You can also schedule the Disk Defragmenter to run automatically. (Your computer might even be set up this way by default.) Under Schedule, it reads Scheduled defragmentation is turned on and then displays the time of day and frequency of defragmentation. If you want to turn off automatic defragmentation or to change the time or frequency, click Configure schedule (or Turn on Schedule, if it is not currently configured to run automatically). Change the settings, and then click OK.
  7. To close the Disk Defragmenter utility, on the title bar of the window, click the Close button.

Windows Vista users

  1. Open Disk Defragmenter: Click the Start button, click All Programs, click Accessories, click System Tools, and then click Disk Defragmenter. If you are prompted for an administrator password or confirmation, type the password or provide confirmation.
  2. In the Disk Defragmenter dialog box, click the drives that you want to defragment and then click the Analyze disk button. After the disk is analyzed, a dialog box appears letting you know whether you should defragment the analyzed drives.

    Tip: You should analyze a volume before defragmenting it to get an estimate of how long the defragmentation process will take.
  3. To defragment the selected drive or drives, click the Defragment disk button. In the Current status area, under the Progress column, you can monitor the process as it happens. After the defragmentation is complete, Disk Defragmenter displays the results.
  4. To display detailed information about the defragmented disk or partition, click View Report.
  5. To close the View Report dialog box, click Close.
  6. You can also schedule the Disk Defragmenter to run automatically. (Your computer might be set up this way by default.) Click Modify schedule....
  7. In the Disk Defragmenter: Modify Schedule dialog box, choose how often, which day, and at what time of day you want defragmentation to occur, and then click OK.
  8. Click OK again.

Windows XP users

  1. Click Start, point to All Programs, point to Accessories, point to System Tools, and then click Disk Defragmenter.

    Disk Defragmenter dialog box, showing possible disks to defragment
  2. In the Disk Defragmenter dialog box, click the drives that you want to defragment and then click the Analyze button. After the disk is analyzed, a dialog box appears, letting you know whether you should defragment the analyzed drives.

    Tip: You should analyze a volume before defragmenting it to get an estimate of how long the defragmentation process will take.
  3. To defragment the selected drive or drives, click the Defragment button. Note: In Windows Vista, there is no graphical user interface to demonstrate the progress—but your hard drive is still being defragmented.

    After the defragmentation is complete, Disk Defragmenter displays the results.
  4. To display detailed information about the defragmented disk or partition, click View Report.
  5. To close the View Report dialog box, click Close.
  6. To close the Disk Defragmenter utility, on the title bar of the window, click the Close button.

Running Disk Cleanup and Disk Defragmenter on a regular basis is a proven way to help keep your computer running quickly and efficiently. If you'd like to learn how to schedule these tools and others to run automatically, please read Speed up your PC: Automate your computer maintenance schedule.


4. Detect and repair disk errors

In addition to running Disk Cleanup and Disk Defragmenter to optimize the performance of your computer, you can check the integrity of the files stored on your hard disk by running the Error Checking utility.

As you use your hard drive, it can develop bad sectors. Bad sectors slow down hard disk performance and sometimes make data writing (such as file saving) difficult or even impossible. The Error Checking utility scans the hard drive for bad sectors and scans for file system errors to see whether certain files or folders are misplaced.

If you use your computer daily, you should run this utility once a week to help prevent data loss.

Run the Error Checking utility:

  1. Close all open files.
  2. Click Start, and then click Computer.
  3. In the Computer window (My Computer in Windows XP), right-click the hard disk you want to search for bad sectors, and then click Properties.
  4. In the Properties dialog box, click the Tools tab.
  5. Click the Check Now button.
  6. In the Check Disk dialog box (called Error-checking in Windows 7), select the Scan for and attempt recovery of bad sectors check box, and then click Start.

    Check Disk Local Disk dialog box, with the Scan for and attempt recovery of bad sectors check box selected
  7. If bad sectors are found, choose to fix them.

Tip: Only select the "Automatically fix file system errors" check box if you think that your disk contains bad sectors.


5. Learn about ReadyBoost

If you're using Windows 7 or Windows Vista, you can use ReadyBoost to speed up your system. A new concept in adding memory to a system, it allows you to use non-volatile flash memory—like a USB flash drive or a memory card—to improve performance without having to add additional memory.


6. Upgrade to Windows 7

If you try all the previous remedies and your computer still isn't as fast as you would like it to be, you may want to consider updating to Windows 7.

মঙ্গলবার, ১ নভেম্বর, ২০১১

সিসিএনএ অভিযান :: নেটওয়ার্কিং এ ক্যারিয়ার করতে আগ্রহী, শুধু তাদের জন্য – OSPF [অভিযান-১০]

Area 0 হলো যেখানে Backbone router গুলো থাকে। Area 0 এর সাথে Area border Router গুলো সংযুক্ত থাকে। অন্য কোন রাউটিং ডোমেন এর সাথে সংযুক্ত হওয়ার জন্য Autonomous System border Router ব্যবহার করা হয়।প্রত্যেক এরিয়াতে আবার Designated router আর Backup Designated router থাকে।

ওএসপিএফ কি?

ওএসপিএফ হলো ওপেন শর্টেস্ট পাথ ফার্স্ট একটি লিঙ্ক স্টেট রাউটিং প্রটোকল যা ওপেন স্ট্যান্ডার্ডের উপর ভিত্তি করে গড়ে উঠেছে।তাই এটি সিসকোসহ অন্যান্য রাউটারেও কাজ করে। ওএসপিএফ ব্যাপকভাবে ইনটেরিয়র গেটওয়ে প্রটোকল হিসেবে ব্যবহিত হয়ে থাকে, বিশেষকরে বড় নেটওয়ার্কে।

ওএসপিএফ এর বৈশিষ্ট্যসমুহ:

  • ওএসপিএফ রাউটিং ডোমেইনকে এরিয়াতে বিভক্ত করে।
  • কেবল রাউট পরিবর্তনের সময় রাউট আপডেট ঘটে।
  • যে রাউট বদলেছে কেবল সেটির তথ্য থাকে এলএসএ(LSA)(লিংক স্টেট অ্যাডভার্টাইমেন্ট) এ।
  • প্রতিবেশী গড়ে তোলার জন্য হ্যালো(Hello) মেসেজ বিনিময় করে।
  • ওএসপিএফ ভ্যারিয়েবল লেংথ সাবনেট মাস্ক(VLSM) এবং ক্লাসলেস ইন্টার ডোমেইন রাউটিং (CIDR)সাপোর্ট করে।
  • ওএসপিএফ অসংখ্য নেটওয়ার্ক হোপ সমর্থন করে।
  • ওএসপিএফ এর মাল্টিকাস্ট এড্রেস হলো(২২৪.০.০.৫ এবং ২২৪.০.০.৬)
  • ইহায় ব্যবহিত এলগ্যারিদম হলো ডিজেক্সট্রা শর্টেস্ট পাথ ফার্স্ট।

ওওসপিএফ এর টেবিলসমূহ:

ওএসপিএফ তিনটি টেবিল ব্যবহার করে- প্রতিবেশী টেবিল, লিংক স্টেট টেবিল এবং রাউটিং টেবিল। এই তিনটি টেবিলের সমন্বয়ে ওওসপিএফ পুরো নেটওর্য়াকের চিত্র পায়।
  • প্রতিবেশী টেবিল(Neighbors table):
কোন রাউটারের আসে পাশে কোন রাউটার আছে সে সম্পকির্ত তথ্য থাকে এই টেবিলে।
  • লিংক স্টেট টেবিল(Link-state table):
প্রতিবেশী রাউটার সমুহের সাথে যুক্ত লিংকসমুহের কোনটির অবস্থা কেমন সে সম্পর্কিত তথ্য রাখা হয় এই টেবিলে।
  • রাউটিং টেবিল(Routing table):
লিংক স্টেট টেবিলে যেসব লিংকের তথ্য থাকবে সেগুলোর প্রতিটির ব্যয় কত হবে সে সম্পর্কিত তথ্য থাকবে রাউটিং টেবিলে।

চলুন এবার একটি Lab করি:

Host name and IP address কনফিগারেশন ইন রাউটার-১:

1
2
3
4
5
6
7
8
9
10
11
12
13
14
15
16
17
18
19
20
21
22
23
24
25
26
27
28
29
30
31
32
33
34
35
36
37
38
39
40
41
42
43
Router>en
Router#configure terminal
Enter configuration commands, one per line. End with CNTL/Z.
Router(config)#hostname titas
titas(config)#interface fastEthernet 0/0
titas(config-if)#ip address 192.168.10.1 255.255.255.0
titas(config-if)#no shutdown
%LINK-5-CHANGED: Interface FastEthernet0/0, changed state to up
titas(config-if)#exit
titas(config)#interface fastEthernet 0/1
titas(config-if)#ip address 192.168.11.1 255.255.255.0
titas(config-if)#no shutdown
titas(config-if)#
%LINK-5-CHANGED: Interface FastEthernet0/1, changed state to up
%LINEPROTO-5-UPDOWN: Line protocol on Interface FastEthernet0/1, changed state to up
titas(config-if)#exit
titas(config)#exit
%SYS-5-CONFIG_I: Configured from console by console
titas#wr
Building configuration...
[OK]
titas#reload

Host name and IP address কনফিগারেশন ইন রাউটার-২:

1
2
3
4
5
6
7
8
9
10
11
12
13
14
15
16
17
18
19
20
21
22
23
24
25
26
27
28
29
30
31
32
33
34
35
36
37
38
39
40
41
42
43
Router>en
Router#configure terminal
Enter configuration commands, one per line. End with CNTL/Z.
Router(config)#hostname sarker
sarker(config)#interface fastEthernet 0/0
sarker(config-if)#ip address 192.168.10.2 255.255.255.0
sarker(config-if)#no shutdown
%LINK-5-CHANGED: Interface FastEthernet0/0, changed state to up
%LINEPROTO-5-UPDOWN: Line protocol on Interface FastEthernet0/0, changed state to up
sarker(config-if)#exit
sarker(config)#interface fastEthernet 0/1
sarker(config-if)#ip address 192.168.12.1 255.255.255.0
sarker(config-if)#no shutdown
%LINK-5-CHANGED: Interface FastEthernet0/1, changed state to up
%LINEPROTO-5-UPDOWN: Line protocol on Interface FastEthernet0/1, changed state to up
sarker(config-if)#exit
sarker(config)#exit
%SYS-5-CONFIG_I: Configured from console by console
sarker#wr
Building configuration...
[OK]
sarker#reload

Open Shortest Path Fast (OSPF) Protocol কনফিগারেশন ইন রাউটার-১:

1
2
3
4
5
6
7
8
9
10
11
12
13
14
15
16
17
18
19
20
21
22
23
24
25
26
27
For R1
titas>en
titas#configure terminal
Enter configuration commands, one per line. End with CNTL/Z.
titas(config)#router ospf 1
titas(config-router)#network 192.168.10.0 0.0.0.255 area 0
titas(config-router)#network 192.168.11.0 0.0.0.255 area 0
titas(config-router)#exit
titas(config)#exit
%SYS-5-CONFIG_I: Configured from console by console
titas#wr
Building configuration...
[OK]
titas#

Open Shortest Path Fast (OSPF) Protocol কনফিগারেশন ইন রাউটার-2:

1
2
3
4
5
6
7
8
9
10
11
12
13
14
15
16
17
18
19
20
21
22
23
24
25
26
27
sarker>en
sarker#configure terminal
Enter configuration commands, one per line. End with CNTL/Z.
sarker(config)#router ospf 1
sarker(config-router)#network 192.168.10.0 0.0.0.255 area 0
00:05:34: %OSPF-5-ADJCHG: Process 1, Nbr 192.168.11.1 on FastEthernet0/0 from LOADING to FULL, Loading Done
sarker(config-router)#network 192.168.12.0 0.0.0.255 area 0
sarker(config-router)#exit
sarker(config)#exit
%SYS-5-CONFIG_I: Configured from console by console
sarker#wr
Building configuration...
[OK]

Verify connectivity with ping command :

Have a nice day for all.................. 8-) :

সিসিএন এ অভিযান :: নেটওয়ার্কিং এ ক্যারিয়ার করতে আগ্রহী, শুধু তাদের জন্য – স্ট্যাটিক রাউটিং [অভিযান-০৯]

স্ট্যাটিক রাউট

ছোট নেটওয়ার্কের ক্ষেত্রে, যেখানে রাউট পরিবর্তন বিরল, স্ট্যাটিক রাউট ব্যবহার করাই উত্তম। এই রাউটিং এ যদি কোনো রাউট পরিবর্তন ঘটে তাহলে ম্যানুয়ালি তা আপডেট করতে হয়।

স্ট্যাটিক রাউট ব্যবহারের সুবিধাগুলো হলো:

  • রাউটিং ইফিসিয়েন্সি: স্ট্যাটিক রাউটিং এ রাউটার খুব দ্রুত কাজ করে । ফলে নেটওর্য়াক ব্যান্ডউইদ কম খরচ হয়।
  • নিরাপত্তা : আপনার ডাটা কোন পথে পরিবাহিত হবে তা নিয়ন্ত্রন করতে পারেন কিছু রাউট ম্যানুয়ালি কনফিগার করে।

স্ট্যাটিক রাউট ব্যবহারের কিছু অসুবিধা গুলো হলো :

  • মেইনটেন্যান্স: নেটওয়ার্ক এ রাউট পরিবর্তিত হলে ম্যানুয়ালি তা পরিবর্তন করতে হয়। ছোট নেটওর্য়াকের ক্ষেত্রে এটি করা সম্ভব হলেও বড় নেটওয়াকের্র ক্ষেত্রে তা কঠিন হয়ে দাড়ায়।
  • নির্ভুলতা: ম্যানুয়ালি রাউট কনফিগার করতে হয় বলে সেখানে ভুল হওয়ার সম্ভাবনা বেশি থাকে।

স্ট্যাটিক রাউট এর সিনট্যাক্স হলো :

ip route dest-ip subnet {next-hop-ip| interface}

ডেস্টিনেশন আই পি : এর মাধ্যমে গন্তব্য নেটওয়ার্কের আইপি এড্রেস উল্লেখ্য করতে হবে।

সাবনেট : গন্তব্য নেটওয়ার্কের আইপি সাবনেট মাস্ক।

নেক্সট আই পি/ ইন্টারফেইজ : এটি হলো আইপি গেইটওয়ে যার মাধ্যমে আপনি বাইরের নেটওর্য়াকের সাথে যুক্ত হবেন।

For R2 router interface configuration command:

Router>en

Router#configure terminal

Enter configuration commands, one per line. End with CNTL/Z.

Router(config)#interface fastEthernet 0/0

Router(config-if)#ip address 192.168.12.1 255.255.255.0

Router(config-if)#no shutdown

%LINK-5-CHANGED: Interface FastEthernet0/0, changed state to up

Router(config-if)#exit

Router(config)#interface fastEthernet 0/1

Router(config-if)#ip address 192.168.10.1 255.255.255.0

Router(config-if)#no shutdown

%LINK-5-CHANGED: Interface FastEthernet0/1, changed state to up

%LINEPROTO-5-UPDOWN: Line protocol on Interface FastEthernet0/1, changed state to up

Router(config-if)#exit

Router(config)#exit

Router#wr

For Router 4 interface configuration command

Router>en

Router#configure terminal

Enter configuration commands, one per line. End with CNTL/Z.

Router(config)#

Router(config)#interface fastEthernet 0/0

Router(config-if)#ip address 192.168.12.2 255.255.255.0

Router(config-if)#no shutdown

%LINK-5-CHANGED: Interface FastEthernet0/0, changed state to up

%LINEPROTO-5-UPDOWN: Line protocol on Interface FastEthernet0/0, changed state to up

Router(config-if)#exit

Router(config)#inter

Router(config)#interface fastEthernet 0/1

Router(config-if)#ip address 192.168.11.1 255.255.255.0

Router(config-if)#no shutdown

%LINK-5-CHANGED: Interface FastEthernet0/1, changed state to up

%LINEPROTO-5-UPDOWN: Line protocol on Interface FastEthernet0/1, changed state to up

Router(config-if)#exit

Router(config)#exit

%SYS-5-CONFIG_I: Configured from console by console

Router#wr

static routing (Router 2 )

outer#en

Router#con

Router#conf

Router#configure ter

Router#configure terminal

Enter configuration commands, one per line. End with CNTL/Z.

Router(config)#ip route

Router(config)#ip route 192.168.11.0 255.255.255.0 192.168.12.2

Router(config)#exit

For static routing (Router 4 )

outer#en

Router#con

Router#conf

Router#configure ter

Router#configure terminal

Enter configuration commands, one per line. End with CNTL/Z.

Router(config)#ip route

Router(config)#ip route 192.168.10.0 255.255.255.0 192.168.12.1

Router(config)#exit

সিসিএন এ অভিযান :: নেটওয়ার্কিং এ ক্যারিয়ার করতে আগ্রহী, শুধু তাদের জন্য – রাউটার এ পাসওয়ার্ড কনফিগারেশন প্রসেস [অভিযান-০৮]

সিসকো মোড কনফিগারেশন পদ্ধতি

সিসকো সাধারণত ৪টি মোড থাকে।

  1. EXE mode
  2. Privilege mode
  3. Global configuration mode
  4. Interface mode
  • User EXE mode

সিসকো রাউটার সমূহের ইউজার EXE মোড হলো স্বাভাবিক অপারেশন মোড। সিসকো ডিভাইস চালু হওয়ার পর আইওএস লোড হয় এবং EXE মোড এ আসে। EXE মোড এর সিম্বল হলো “>”. এই EXE মোড এ পাসওয়ার্ড দেওয়ার পদ্ধতি নীচে বণর্না করা হলো:-

Exe mode command

1
2
3
4
5
6
7
8
9
10
11
12
13
14
15
16
17
18
19
Router>en
Router#configure terminal
Enter configuration commands, one per line. End with CNTL/Z.
Router(config)#line console 0
Router(config-line)#password cisco123
Router(config-line)#login
Router(config-line)#exit
Router(config)#exit
%SYS-5-CONFIG_I: Configured from console by console
Router#wr

Privilege mode:

সিসকো রাউটার সমূহের এডভান্সড অপারেশন মোড হলো প্রিভিলেজড মোড। প্রিভিলেজড মোড এর সিম্বল হলো “#”.প্রিভিলেজড মোড এ পাসওয়ার্ড কনফিগারেশন নিয়ম নীচে বর্ণনা করা হলো:

1
2
3
4
5
6
7
8
9
10
11
12
13
14
15
16
17
Router>en
Router#configure terminal
Configuring from terminal, memory, or network [terminal]?
Enter configuration commands, one per line. End with CNTL/Z.
Router(config)#enable password
Router(config)#enable password titas123
Router(config)#exit
%SYS-5-CONFIG_I: Configured from console by console
Router#wr

Global Configuration mode :

গ্লোবাল কনফিগারেশন মোড হলো সেই অপারেশন যেখানে কোনো কনফিগারেশন কমান্ড দেওয়া হলে তা পুরো ডিভাইসে কাজ করে। তবে গ্লোবাল কনফিগারেশন মোডে যেতে হলে প্রথমে প্রিভিলাইজড মোডে যেতে হবে।

1
2
3
4
5
6
7
8
9
Router>en
Router#configure terminal
Configuring from terminal, memory, or network [terminal]?
Enter configuration commands, one per line. End with CNTL/Z.
Router(config)#

Interface mode :

সিসকো ডিভাইসের নির্দিষ্ট কো ইন্টারফেইসকে কনফিগার করার জন্য মোডে যেতে হয়। নীচে একটি পোর্ট কনফিগার করার পদ্ধতি দেওয়া হলো:

1
2
3
4
5
6
7
8
9
10
11
Router>en
Router#configure terminal
Enter configuration commands, one per line. End with CNTL/Z.
Router(config)#interface fastEthernet 0/0
Router(config-if)#ip address 192.168.60.1 255.255.255.0
Router(config-if)#no shutdown